|
The Rockbridge Bloomery –
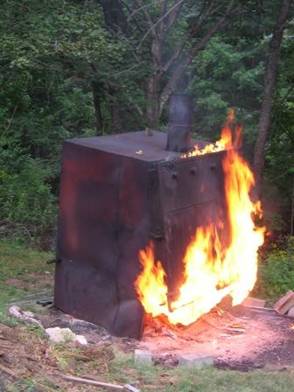
Reports Easy Clean Charcoal in a BarrelBy Lee Sauder Skip and I have tried about every way to make charcoal to fuel our bloomeries. We generally make our charcoal in a large retort built from a dumpster. Here’s a photo of that beast in action.
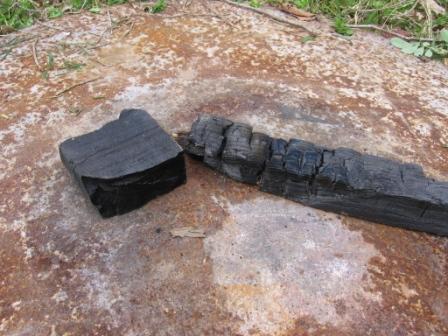
But off and on over the past year I’ve been experimenting again with smaller scale production in 55 gal drums, with the (as yet unrealized) object of testing some of my prejudices about the use of different species of wood for charcoal. I’ve come up with a pretty easy and clean method to make high quality charcoal that I thought might be worth sharing. The Basic Idea To make good strong charcoal for smelting and forging by smoldering (as opposed to cooking in a retort), it’s important that the fire is traveling in the opposite direction from the draft. For instance, in a traditional clamp or “meiler’, the fire is lit in the chimney, and burns back towards the intake vents. You can get an idea of why this is important from the photo below. The coal on the left was produced with the fire burning towards the draft. it is hard and strong and rings when struck. The piece on the right was produced with the draft and fire traveling in the same direction. It is weak, crumbly, and crunchy.
One of the first ways Skip and I made charcoal was in a 55 gal drum by the method described by Ken Scharabok in Countryside Magazine, Amaze your friends and neighbors: make your own charcoal!, and I think this has achieved some pretty widespread currency. Basically you fill a drum with wood, and then tip it up onto a small fire, and let it smolder to the top. But this produces a low yield of weak charcoal; I think at best we got 25 lbs of oak charcoal from one barrel. Here’s a better
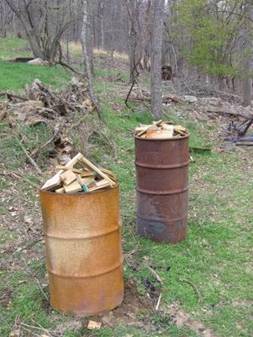
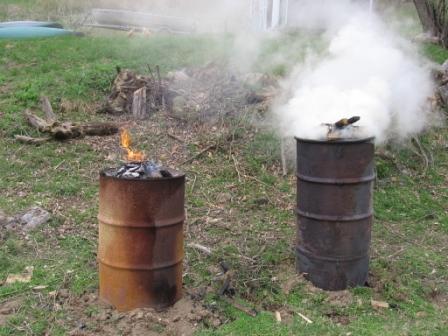
way: Take a 55 gallon drum with a removable lid. Stand it up with the open end up. At the bottom, cut six 1” holes evenly spaced around the perimeter as intake vents (keep experimenting with # and size of holes, I’m not settled on this yet). Fill the barrel with small wood- I’ve mostly been using oak flooring cutoffs, but I think the main thing is that you have the barrel fairly tightly packed. (note: you will not see the vents in these photos- I had the bottom open on these)
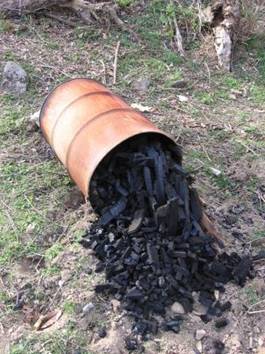
Start a fire on top of the barrelful of wood. Let it burn down to the bottom vents- this might take 6 or 8 hours. Put the lid on the barrel, and toss some dirt on the vents to seal them. Come back in the morning when it’s cooled, and harvest your charcoal. That’s it.
OK, it’s not quite that simple, but you get the idea. It seems the fire will smolder down to the vents on the downwind side first, so you need to watch the vents and close them one by one. You also need to watch that a burning coal doesn’t fall to the vent so that the wood starts burning the wrong direction. I find that an infrared pyrometer is a handy tool to monitor the distribution of temperature in the barrel. You want to achieve a temperature of 450 or 500 deg F everywhere to ensure coaling. If you get over 700 deg you’re probably just burning stuff up. One of the advantages of this method is that all the steam and gases produced by the distillation have to pass by the hottest part of the fire, which tends to clear them up. If you keep a little fire going on top of the pile as it settles, this will help burn off those gases as well, and give you a little extra charcoal, though the extra charcoal is not of as good quality. Barrel on left with fire on top, barrel on right just smoldering on it’s own.
Michael McCarthy has been able to use this method indoors, under a vented hood, thus heating the shop and making charcoal at the same time, with no complaints from the neighbors (though I reckon he has them all pretty well trained). This method is far from perfected, so I’d be interested in hearing of your experiences and improvements. Best Lee Sauder |