The Rockbridge Bloomery - Reports
Making a Copper tuyere from Scrap
Skip Williams
On the first warm day, after so many ice and snow
filled days where the thought of sticking my hands into a bucket of cold clay
was terrifying at the least, I managed to get out into the backyard to try out
one of those ideas that got stuck in my craw back in the warmer days of the
fall.
In this case the idea was to melt down a bunch of copper scrap to make a
tuyere. The scrap I want to use comes from pieces of water pipe, bits of copper
left over from the new roof, and the stuff that the junkman down the road pulls
out of old decaying refrigeration units. The scrap value of this sort of copper
is around a dollar a pound and when compared to a new copper plate that costs
nearly $70 per tuyere, this looks like a sweet deal! A little research on the
internet showed that these types of copper are 99.9 percent pure and should
have a melting point of around 1050 degrees C. Nothing wrong
with that. So sticking to the dictum of 'cheap and easy', I just had to
try it.
 Building the clay crucible.
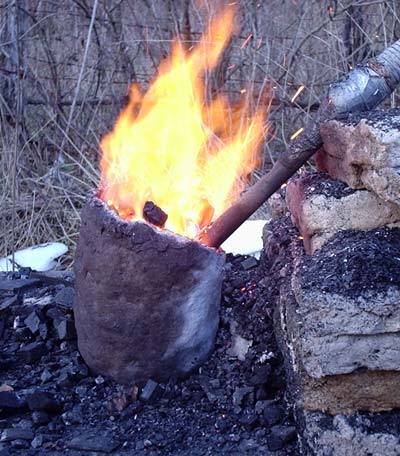
The first thing is to choose a spot to build the crucible. I usually just plop
a piece of sheet metal on a few cinder blocks to get things up off of the
ground and build the crucible right where it will be used. Twelve pounds of DRY
clay and two pounds of cellulose fiber are mixed in a wheelbarrow and water is
added until the consistency is something like day old mashed potatoes i.e. you
can push them around but they pretty much set-up in a solid lump where ever you
stop pushing. I start by laying a 1/2 inch layer of this clay mixture which
will become the bottom of the crucible. Then I build up the walls using a
coffee can (wrapped with newspaper) as the interior mold. The wall is 6 inches
tall on the tuyere side and 8 inches tall on the opposite side. Take a look at
the image to the right to see what I mean. Without any waiting I remove the
coffee can and newspaper. Since the melted copper will take the exact shape of
the bottom of the crucible I can choose to leave the bottom as it is or to
shape it with a little more clay. Immediately, I start a drying fire in the
crucible. No need to hesitate, I just hook up a 1/2 inch copper tube to your
air supply and let her rip. I used small chunks of hardwood during the
drying which lasted for one hour. When the crucible is dry, I burn down the
remaining hardwood coals and crush them to powder.
The Melting
 I refill the crucible with a couple handfuls
of charcoal and I’m ready to go. The charcoal size I used ranged from fines up
to 2cm. From this point on, I just add a few bits of scrap copper and a handful
of charcoal whenever there's room in the crucible. I should also say that the
copper is placed, bit by bit, on the tall side of the crucible, away from the
tuyere, instead of over the tuyere to keep it from oxidizing away. Sheets of copper
seemed to melt fastest when they were cut into small strips and then crinkled
(flat sheets had a tendency to stick together). Tubes of copper are set
vertically in the crucible and melt directly into the copper pool below. Copper
wire preferred to be balled-up.
I refill the crucible with a couple handfuls
of charcoal and I’m ready to go. The charcoal size I used ranged from fines up
to 2cm. From this point on, I just add a few bits of scrap copper and a handful
of charcoal whenever there's room in the crucible. I should also say that the
copper is placed, bit by bit, on the tall side of the crucible, away from the
tuyere, instead of over the tuyere to keep it from oxidizing away. Sheets of copper
seemed to melt fastest when they were cut into small strips and then crinkled
(flat sheets had a tendency to stick together). Tubes of copper are set
vertically in the crucible and melt directly into the copper pool below. Copper
wire preferred to be balled-up.
The Burn down
After all of the copper was added, the charcoal was allowed to burn down until
I could see a thin layer of scoria floating on the top of the copper pool. The
scoria is a combination of wood ash, copper oxide, and clay furnace wall that
will inevitably appear. If I were to leave it as it is, the scoria will become
imbedded in the copper as it is forged and generally screw things up. So to get
rid of the scoria I threw a modest handful of Borax directly on the melt. It
was fun to watch this up close (with safety gear on)! Also, some people recommend adding at oxygen
‘getter to’ the melt (Available from casting supply stores).
 The Results
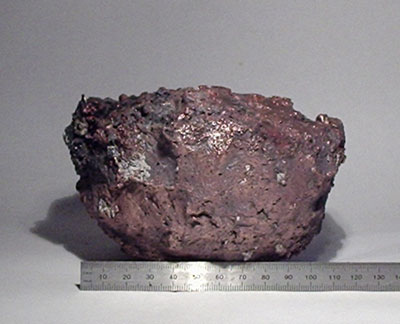
In this manner, it took 3 hours to melt 9 pounds of copper and to produce the
copper button that you see in the image above.
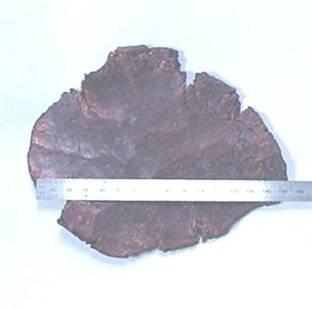
The image to the right shows the result of a similar experiment using only two pounds of copper that has been forged into a plate measuring 15cm x 10cm x 1cm. The copper button is easily forged by normal blacksmithing techniques in a coal forge although charcoal is probably a better fuel for welding.
In the end, I would classify this as 'cheap and easy' but it was also great
fun. I hope that some of you have a chance to try this approach and to improve
upon it.
Skip Williams